

FileZilla is a versatile, open-source FTP solution. This free application extends its usage across FTP over TLS (FTPS) and SFTP. It uses robust encryption methods and multi-threaded operations for Windows, Linux, and macOS to allow secure data transfers. With detailed logging and customizable settings, this FTP solution rises as a powerful tool. If you are looking to manage large volumes of files across various platforms, FileZilla is your ultimate solution.
Our coverage will briefly introduce the main configuration aspects, underscoring vital security and performance settings to achieve a stable and effective setup.
Configuring FileZilla FTP Server Step-by-Step
This guide explains how to install and configure the FileZilla FTP Server on Windows machine. It covers downloading the installer, setting up secure TLS options, creating a user, and finally testing the connection.
- Start by obtaining the FileZilla Server installer from the official website (https://filezilla-project.org/download.php?type=server).
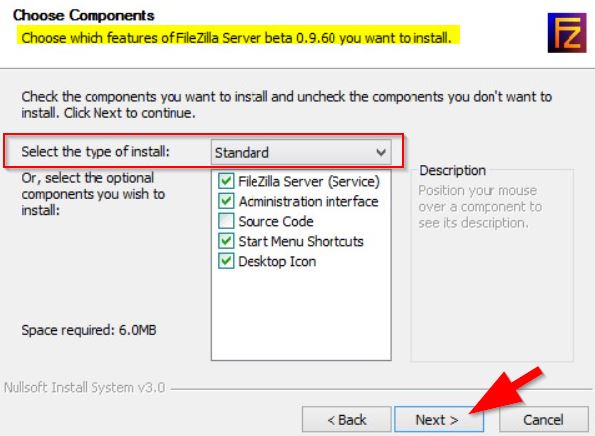
- On the newly appeared screen, beside Select the type of install choose Standard and click on the Next button form the bottom of the screen.
- Launch the downloaded executable and proceed through the installation using the default options (FileZilla_Server-x 0_9_60_2.exe), selecting your desired install location and startup preferences.
- After installation, open the server interface and connect locally with the admin credentials.
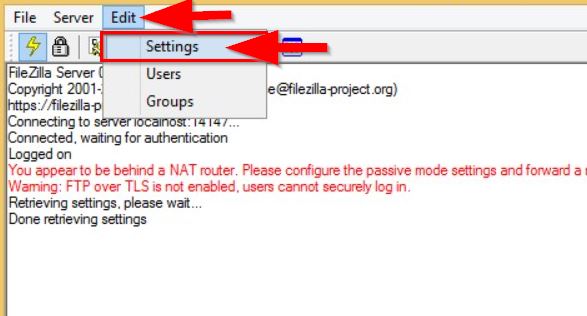
- Go to Edit from top of the screen and click on Settings and locate the FTP over TLS section.
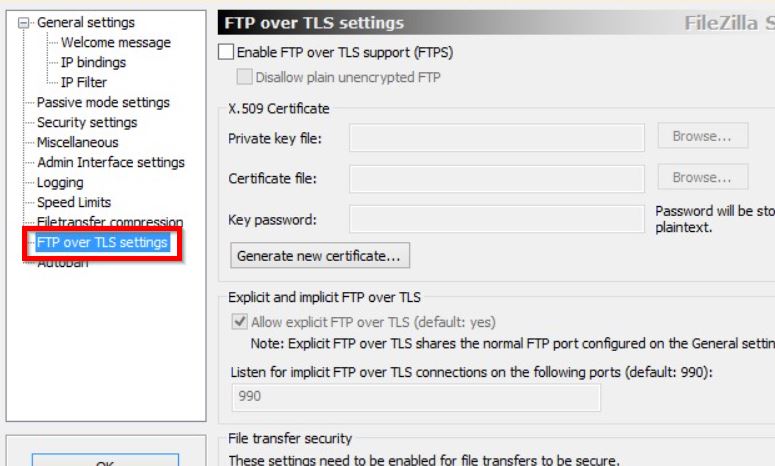
- Here, enable FTPS over TLS Support (FTPS), tick beside Allow explicit FTP over TLS (default: yes) and set the port for implicit FTPS (typically port 990).
NOTE: If you lack a trusted SSL certificate, generate a self-signed one using details like country code, state, city, organization, unit, a contact email, and the common server’s name.
- Then, switch to the user management area to add a new FTP account, for that click on Edit (from the top of the screen) and select Users and click on Add—enter a username, enable the account, and define a password.
- No click on the Shared folders under the Page section, click on Add button and designate the user’s home directory.
- And choose the FTP location from the new prompt.
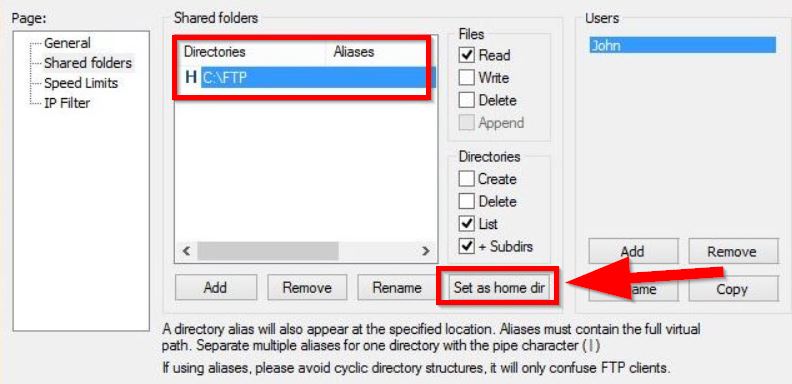
- Then you can setup the Home directory by click on the Set as home dir button from the bottom of the screen.
- Next, click on OK button.
- Complete the process by closing the configuration window and testing the FTPS setup with an FTP client from the FileZilla website.
That’s all, you can now deploy your FileZilla FTP Server setup. Your server is all set for smooth and reliable operations, whether you want to handle personal files or professional data.
Host your FTP on a Managed VPS
Choosing a managed VPS for your FTP needs ensures a secure and reliable file transfer experience. Unlike shared hosting, our reliable VPS servers offer dedicated resources and isolation, guaranteeing consistent performance and minimizing security risks. By securing your FTP with a Ucartz VPS server (SFTP can be implemented), you can ensure that the data being sent is safe from theft, unwanted access, and tampering.
In any case, configuring FileZilla FTP server on Windows provides a simple way to securely establish local or remote file sharing. For those who want to explore similar functionality on different platforms, you can check out this article that takes an in-depth look at configuring FTP servers on Linux operating systems. If you have any more doubts, our dedicated server support team will help you install and configure the FTPS server and resolve any issues you may encounter.