

FileZilla FTP Server is an open-source solution widely known for its robust user access control system. It allows users to host and manage FTP services on Linux systems, supporting multiple protocols and streamlining secure and efficient file transfer. FileZilla FTP Server lets admins define who can access specific files and directories, keeping security paramount.
As an open-source software, FileZilla is free to use and accessible even for those with limited technical knowledge. This article will cover the step-by-step configuration of optimizing FileZilla FTP Server on Linux. We will cover all essential steps, making your task easier and well-guided. For those interested in a Windows setup, refer to our guide on how to configure the FileZilla FTP server on Windows.
Configuring FileZilla FTP server on Linux- A Detailed Guide
Before walking through the steps, it is important to verify that you meet these requirements:
- A root user or a user with sudo privileges.
- Your system has latest Ubuntu update installed.
Now let’s move on to the step-by-step of the configuration process-
Setting up the FileZilla FTP Server on Ubuntu is a smooth process. The first step requires updating/ upgrading all of your system packages. To do so, run this command:
apt update -yapt upgrade -yOnce done, download and install the FileZilla FTP server.
Now, visit the FileZilla FTP download location and install the latest version of Linux. Run the following command for installation:
dpkg -i FileZilla_Server_1.6.1_x86_64-linux-gnu.deb
Some users might receive dependency errors like these:
Selecting previously unselected package filezilla-server.
(Reading database ... 73317 files and directories currently installed.
Preparing to unpack FileZilla_Server_1.6.1_x86_64-linux-gnu.deb ...
Unpacking filezilla-server (1.6.1) ...
dpkg: dependency problems prevent configuration of filezilla-server:
filezilla-server depends on libcairo2 (>= 1.16.0); however:
Package libcairo2 is not installed.
filezilla-server depends on libgdk-pixbuf-2.0-0 (>= 2.42.2+dfsg); however:
Package libgdk-pixbuf-2.0-0 is not installed.
filezilla-server depends on libgtk2.0-0 (>= 2.24.33); however:
Package libgtk2.0-0 is not installed.
filezilla-server depends on libpango-1.0-0 (>= 1.46.2); however:
Package libpango-1.0-0 is not installed.
filezilla-server depends on libpangocairo-1.0-0 (>= 1.46.2); however:
Package libpangocairo-1.0-0 is not installed.
filezilla-server depends on libsm6 (>= 2:1.2.3); however:
Package libsm6 is not installed.
dpkg: error processing package filezilla-server (--install):
dependency problems - leaving unconfigured
Errors were encountered while processing:
filezilla-server
To get through them, run the command apt install -f and continue the installation process. If you are asked to set an admin password at this stage, follow the prompt and press Enter to complete the installation.
Systemd, by default, manages the FileZilla service using the systemctl command line utility. Use this command to start the service:
systemctl start filezilla-serverNow run the below given command and enable FileZilla to start automatically after reboot.
systemctl enable filezilla-server Next, again run the below mentioned command and verify the status of the FileZilla service.
systemctl status filezilla-server You may now see the status of the FileZilla server in this output:
filezilla-server.service - A free open source FTP and FTPS Server.
Loaded: loaded (/etc/systemd/system/filezilla-server.service; enabled; vendor preset: enabled)
Active: active (running) since Thu 2022-12-29 05:06:06 UTC; 33s ago
Main PID: 2038 (filezilla-serve)
Tasks: 9 (limit: 2242)
Memory: 7.8M
CPU: 29ms
CGroup: /system.slice/filezilla-server.service
└─2038 /opt/filezilla-server/bin/filezilla-server --config-dir /opt/filezilla-server/etc
April 04 05:06:06 ubuntu systemd[1]: Started A free open source FTP and FTPS Server..
April 04 05:06:06 ubuntu filezilla-server[2038]: Setting up TLS for the FTP Server
April 04 05:06:06 ubuntu filezilla-server[2038]: SHA1 certificate fingerprint: ab:14:e4:4d:94:f4:c2:3e:b4:15:ad:10:fd:5a:88:d6:54:31:66:3e
April 04 05:06:06 ubuntu filezilla-server[2038]: SHA256 certificate fingerprint: 4f:9a:3a:19:01:ac:58:1c:d4:a2:44:07:57:12:aa:ad:f5:2b:bb:b5:3d>
April 04 05:06:06 ubuntu filezilla-server[2038]: Setting up TLS for the Administration Server
April 04 05:06:06 ubuntu filezilla-server[2038]: SHA256 certificate fingerprint: bb:a0:ac:74:01:0f:28:17:95:c9:25:04:52:12:55:33:47:2c:44:a8:e0>
April 04 05:06:06 ubuntu filezilla-server[2038]: [FTP Server] Listening on 0.0.0.0:21 (tls_mode = 0).
April 04 05:06:06 ubuntu filezilla-server[2038]: [FTP Server] Listening on [::]:21 (tls_mode = 0).
April 04 05:06:06 ubuntu filezilla-server[2038]: [Administration Server] Listening on 127.0.0.1:14148 (tls_mode = 1).
April 04 05:06:06 ubuntu filezilla-server[2038]: [Administration Server] Listening on [::1]:14148 (tls_mode = 1).
To stop this service, run the command,
systemctl stop filezilla-serverAt this stage, FileZilla is running and accepting connections on port 21. To verify, you can execute the command below:
ss -antpl | grep 21You may now see the FTP listening port in the following output.
LISTEN 0 64 0.0.0.0:21 0.0.0.0:* users:(("filezilla-serve",pid=2038,fd=5))
LISTEN 0 64 [::]:21 [::]:* users:(("filezilla-serve",pid=2038,fd=7))
Let’s configure the FileZilla Server.
It is important to know that the FileZilla server stores all of its configuration files in the /opt/filezilla-server/etc/ directory. Use the following commands and see all the files:
Run the below command
ls /opt/filezilla-server/etc/,And you will see,
allowed_ips.xml certificates disallowed_ips.xml groups.xml settings.xml users.xml Run the below command if you want to allow only a specific host to access.
nano /opt/filezilla-server/etc/allowed_ips.xmlRun the following command to add the allowed host’s IP address in this directive.
<allowed_ips></allowed_ips>In case you want to deny specific hosts access to the FileZilla server, run the said command:
nano /opt/filezilla-server/etc/disallowed_ips.xmlFurther, add the IP address in
<disallowed_ips></disallowed_ips>Edit the main configuration file by tweaking the FileZilla FTP server using the said command:
nano /opt/filezilla-server/etc/settings.xmlThis is where you can adjust the FTP port, listening IP, and other configuration parameters, as shown below.
<!--The duration, in milliseconds, during which the number of failed login attempts is monitored.-->
<login_failure_time_window>100</login_failure_time_window>
<!--Login timeout (fz::duration)-->
<login_timeout>60000</login_timeout>
<listener>
<address>0.0.0.0</address>
<port>21</port>
<tls_mode>0</tls_mode>
</listener>
Once done, save and close the file and restart the FileZilla service using the following:
systemctl restart filezilla-serverLet’s create a user for FileZilla
This step involves creating a username by running the following command:
adduser testftpFurther, set the user password through the following steps:
Adding user `testftp' ...
Adding new group `testftp' (1000) ...
Adding new user `testftp' (1000) with group `testftp' ...
Creating home directory `/home/testftp' ...
Copying files from `/etc/skel' ...
New password:
Retype new password:
passwd: password updated successfully
Changing the user information for testftp
Enter the new value, or press ENTER for the default
Full Name []:
Room Number []:
Work Phone []:
Home Phone []:
Other []:
Is the information correct? [Y/n]
Now save and close the file.
Next, edit the users.xml configuration file using the following command:
nano /opt/filezilla-server/etc/users.xmlFurther, find the following line <user name=”<system user>” enabled=”false”> and replace it with <user name=”<system user>” enabled=”true”>
Again, save and close the file and restart to apply the changes by running
systemctl restart filezilla-server
Ultimately, it is time to access the FileZilla FTP server
Since the FileZilla server is installed and configured on your Linux server, you can test it using client software. Here’s a quick guide for doing so:
-On a remote machine, install and launch FileZilla client software.
-Next, click on a new connection, and it will redirect you to a connection screen.
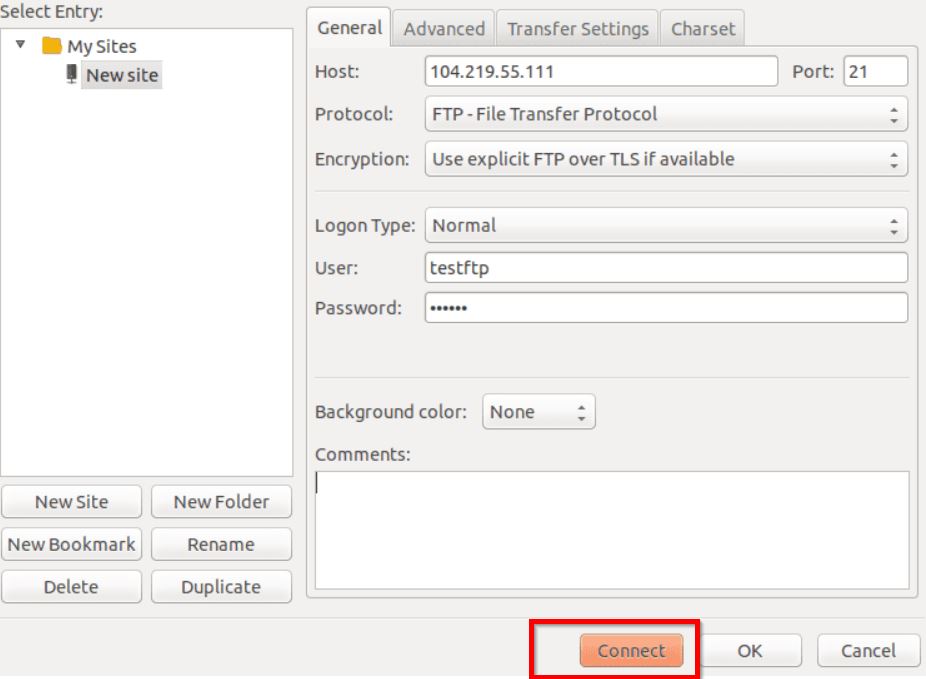
-Here, enter your FileZilla server’s IP address, port, username, and password, then click the Connect button.
-After successfully connecting to the FTP server, a certificate warning will appear on the screen.

-You can click OK to proceed and trust the certificate.
-Finally, you can see the content of your testftp user appearing on the screen.
With that, we are done.
Host Your FileZilla FTP Server to a VPS?
If you are looking for a more stable and high-performing FTP server, hosting on a VPS like Ucartz is your way to go. Ucartz’s affordable VPS server give users top-tier security with robust performance. We provide secure FTP options like FTPS and SFTP, so clients can trust that their file transfers are encrypted and more secure than with a shared hosting. Not only that, but it adds reliability that guarantees smooth file transfers around the clock. With high scalability and easy management, Ucartz makes hosting your FTP server easier than ever.
To wrap up, FileZilla on Linux can be easily set up and optimized. For a more powerful and secure setup, Ucartz VPS can take your FTP server to the next level.