The word nameserver is used interchangeably for both a piece of software that runs on most web servers and as a setting in every domain’s DNS (Domain Name System) configuration.
As a piece of a domain’s DNS configuration, nameservers are the place where everyone trying to access your website will go to look up your DNS information. It is very important to note that these are defined both at the domain registrar, and in a domain’s zone file and that they need to match in both places.
As a piece of software, nameserver references the program that serves DNS information in response to queries. On your cPanel server, you are offered the choice between three of the most common nameserver software: Bind, MyDNS, and NSD. Each has advantages and disadvantages, which are outlined for you in the WHM interface.
Why are nameservers important?
Accurate and stable nameservers are crucial to your site’s uptime and functionality. A misconfiguration in your DNS information will cause your web traffic to be improperly routed, resulting in downtime. Ensuring everything is configured and working properly is absolutely critical to your website’s functionality.
How to: Setting up nameservers on your cPanel server
This tutorial assumes, for the sake of simplicity, that you will be using two nameservers that are run on the same physical server. This is a common configuration, though it is not recommended due to its lack of redundancy.
Prerequisites:
--- A Linux server with cPanel installed, and at least two IPs.
--- An understanding of how to interact with WHM’s interface.
--- A base understanding of terminal and command-line interfacing.
Glossary:
Authoritative nameservers:
The nameserver (or nameservers) that hold the correct information for a given domain.
Caching nameservers:
A nameserver that holds a cached version of DNS information to help speed up query times and reduce query load on the authoritative servers.
Propagation:
The process through which DNS information spreads from authoritative nameservers to caching nameservers.
Query:
The act of asking a nameserver for DNS information regarding a given domain.
Resolve:
The process of translating a domain name to an IP address or an IP address to a domain.
DNS Zone record types:
While these are beyond the scope of this tutorial, if you're going to run a nameserver you should be familiar with at least this list of
zone record types.
Step one: Select a nameserver software on your server in WHM
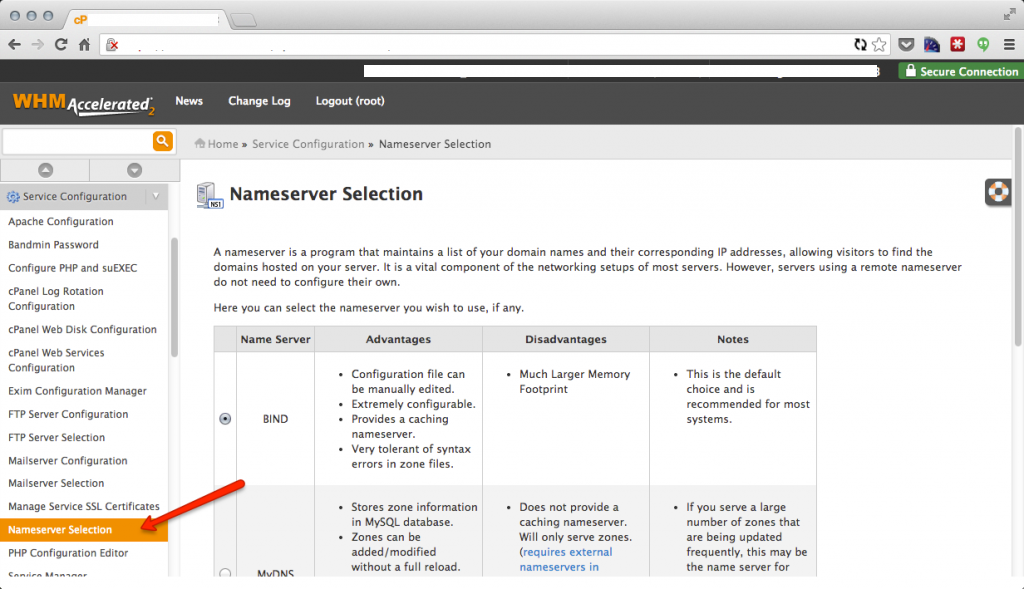
In WHM navigate to Service Configuration, and then Nameserver Selection. You are offered a few choices of cPanel’s supported nameservers. The advantages and disadvantages of each are outlined in WHM to help you in deciding which one is best for you.
Step two: Configure your nameservers
Before you can configure your nameservers you must first decide what you will call your nameservers. The most common options are some variant of ns.yourhost.com. For example, if your hostname were yourhostname.com you might choose to use ns1.yourhostname.com and ns2.yourhostname.com. You can also use other, less obvious subdomains. As an example, cPanel’s nameservers are hg.cpanel.net, c.cpanel.net, and fe.cpanel.net.
To configure your nameservers, you first log in to WHM and navigate to Server Configuration, and then to Basic cPanel & WHM Setup. Scroll to the bottom of that page and you will see the nameserver fields. In those fields enter your chosen nameserver names.
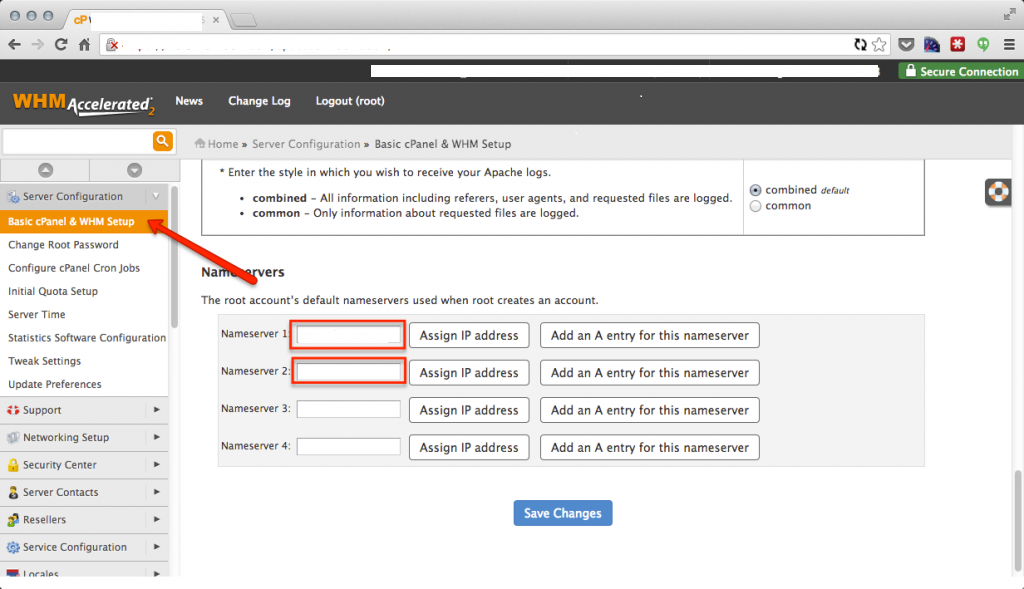
Note: The information entered into these fields will be used as the default nameservers for all domains that are added to your server from this point forward.
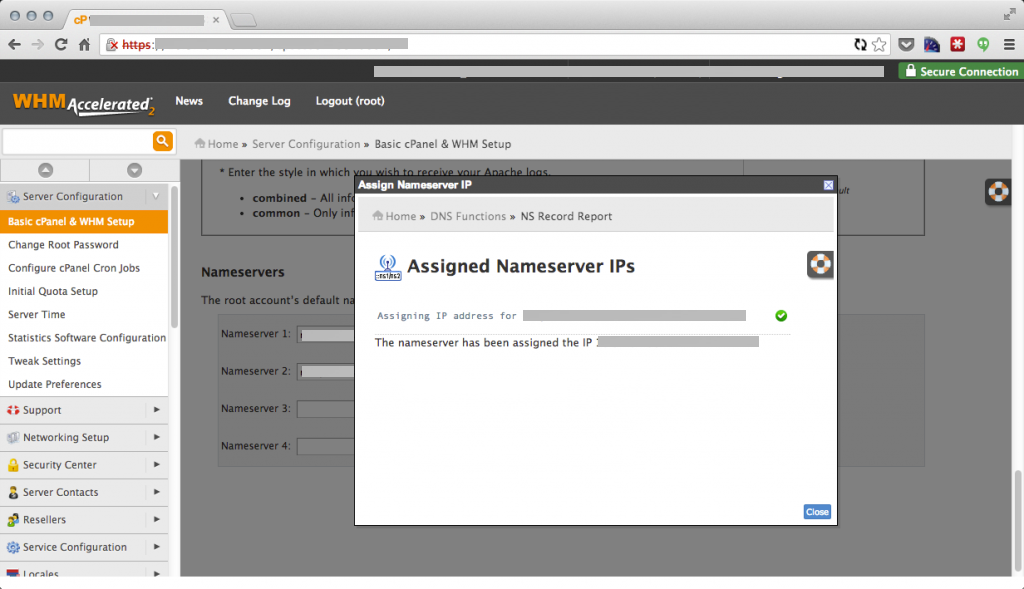
The next step is to assign each of them an IP address. By clicking on ‘Assign IP’ cPanel will do so automatically. Your screen will look something like this:
The next thing you need to do is make sure that your nameserver has an A record. Click the button next to the nameserver and your screen will look something like the screenshot below. As long as you have already assigned an IP address to the nameserver through WHM then the IP address displayed should be correct.
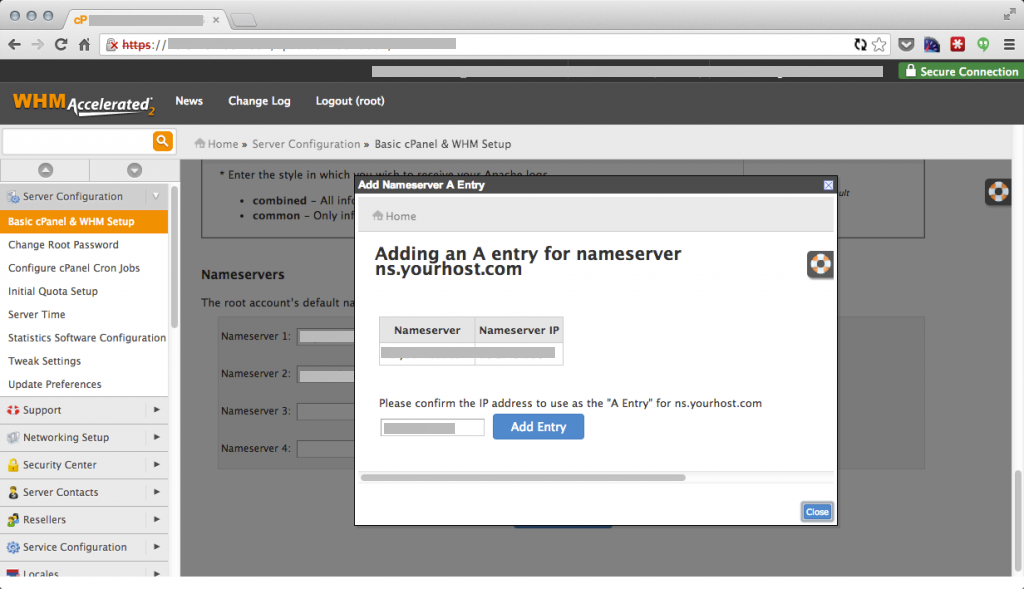
Note: If the DNS for your hostname is not hosted on your server then you will need to configure A records that match the assigned IPs wherever the DNS for your hostname is hosted. This is absolutely necessary for you to be able to register your nameservers successfully.
The best way to quickly verify that your nameserver software is delivering information correctly is to use a command line tool called ‘dig’. By default your nameserver, depending on which software you chose, will very likely not be configured to resolve domains for which it isn’t authoritative, so make sure that you are using a domain that the server is authoritative for in your testing. For this example we will assume that your server is serving the DNS for your hostname, and we will use the server’s hostname for our testing.
Connect to your server via SSH and run this command:
Code:
[~]# dig +short @localhost $HOSTNAME
Code:
[~]# dig +short @localhost $HOSTNAME
192.168.1.119
Step three: Register your nameservers
Nameservers, like domains, need to be registered at a registrar. Nameservers must be registered at the same place as the base domain was registered. So, if our example domain yourhostname.com was registered at GoDaddy, your nameservers (ns1.yourhostname.com and ns2.yourhostname.com) must also be registered at GoDaddy.
You can find more information about registering private nameservers here.
Step four: Test and verify your nameserver is working
Since nameserver configuration can is so crucial to uptime, testing and verifying the configuration before you put mission-critical sites live on your new server is just good server administration practices. One of the most common tools is intodns.com.
intoDNS: checks DNS and mail servers health
With IntoDNS you can get a good, quick look for some of the most common errors and vulnerabilities nameservers might have, as well as a quick error-checking for your existing DNS zone. In this case, we will use cpanel.net to look for errors:
intoDNS: cpanel.net - check DNS server and mail server health
If you see any warnings or errors there you should work to resolve them with your datacenter or system administrator. If you are seeing errors that you can’t get resolved, feel free to open a ticket with our software support team, and we will do our best.
Other things you should understand when running a nameserver:
There is an assortment of things that you should know about when you are responsible for a nameserver. Let’s cover some of them now.
DNS Propagation
All over the internet, there are things called caching nameservers. Caching nameservers do not serve as authoritative for any domains. Rather, they cache DNS lookups, to reduce overall internet traffic and decrease load times.
RDNS (Reverse DNS) or PTR records
If DNS records resolve a domain to an IP address, then reverse (or PTR) records are just the opposite of that: resolving an IP address to a domain. Having your RDNS configured correctly is most crucial to email delivery. For example, if a server you’re sending email to requires that the reverse DNS for the sending IP match the SMTP banner, you will want to make sure that the RDNS for all of your sending IPs matches your hostname.
You can use the ‘dig’ command to look up the RDNS of an IP address with the ‘-x’ flag. Your command for looking up the hostname’s IP looked like this:
Code:
[~]# dig +short @localhost host.yourhostname.com
192.168.1.119
Code:
[~]# dig +short -x @localhost 192.168.1.119
yourhostname.com.
1) Just like DNS is maintained by the authoritative nameservers for the domain, RDNS is maintained by the authority for the IP addresses, which is generally your webhost. Most webhosts will provide you an interface to manage your RDNS, but if they don’t you will need to contact them to get your RDNS set or updated.
2) While most DNS programs don’t limit the number of PTR records per-IP address, most software anticipates there only being one (and most mail delivery systems require there only be one), so make sure you plan on that.
3) If you have multiple IPs on your server and you would like to have each IP dedicated to a single domain on your server, you would want to make use of /etc/mailips and /etc/mailhelo. You can read about how to do that here:
http://documentation.cpanel.net/display/CKB/How+to+Change+the+Sending+IP+for+Outbound+Email+in+Exim
Commandline Tools
For those times that web applications cannot be trusted, or in the event that you prefer the command line, here are some of the most useful command tools for all things DNS:
dig
Dig, a part of the dnsutils package is a very commonly used tool for resolving DNS queries. With no flags or options, it displays the A records for a given domain, but you can request all DNS record types. If a domain has more than one of the requested record type, it will display all of the records. Some of the most useful flags and options are described below (be sure to replace anything with a $ in front of it)
#resolve a domain at a specific nameserver, and display only the IP or no output.
Code:
dig +short $DOMAIN @$NAMESERVER
Code:
dig -x $IPADDRESS
Code:
dig ns $DOMAIN
Code:
dig mx $DOMAIN
Code:
man dig
Is another commonly used DNS lookup tool, with many different options from the dig. With no additional flags or options it will display the IP the domain resolves to, and the domain that the MX record is set to. If the domain is set to a CNAME record, then the host command will display the domain that it resolves to, and the IP that the CNAME resolves to, in addition to the mail record. Back to our example domain, you might see this:
Code:
-bash-4.1# host host.yourhostname.com
host.yourhostname.com is an alias for yourhostname.com.
yourhostname.com has address 192.168.1.119
yourhostname.com mail is handled by 0 yourhostname.com.
-bash-4.1#
Code:
-bash-4.1# host 192.168.1.119
119.1.168.192.in-addr.arpa domain name pointer yourhostname.com.
-bash-4.1#
#tell me what IP address the A record for a given domain contains
Code:
host -t a $DOMAIN
Code:
host -t ns $DOMAIN
Code:
host -t mx $DOMAIN
Code:
man host
Ping is a network tool, but it can be used to assist in DNS related problems, especially in the event that you don’t have permission to use host or dig, as it will still resolve a domain before attempting to send traffic to it. Using the -c flag you can define the number or packets that are sent to the host in question. So, again, using our example domain:
Code:
-bash-4.1# ping -c 1 yourhostname.com
PING yourhostname.com (192.168.1.119) 56(84) bytes of data.
64 bytes from yourhostname.com (192.168.1.119): icmp_seq=1 ttl=50 time=39.2 ms

--- yourhostname.com ping statistics ---
1 packets transmitted, 1 received, 0% packet loss, time 40ms
rtt min/avg/max/mdev = 39.207/39.207/39.207/0.000 ms
-bash-4.1#
Your local resolver file: /etc/resolv.conf
This file is used to define what nameservers the local server will query in the event that it needs DNS information for a domain that it does not consider itself authoritative. It is most common to set this file to your datacenter’s caching nameservers to increase your resolution speeds and reduce excess network-related delays. A quick way to get the contents of the file is to use the cat command:
Code:
-bash-4.1# cat /etc/resolv.conf
# generated by your webhost #
nameserver 10.10.10.10
Code:
dig $DOMAIN @10.10.10.10
Code:
[~]# dig $HOSTNAME @10.10.10.10 +short
yourhostname.com.
192.168.1.119
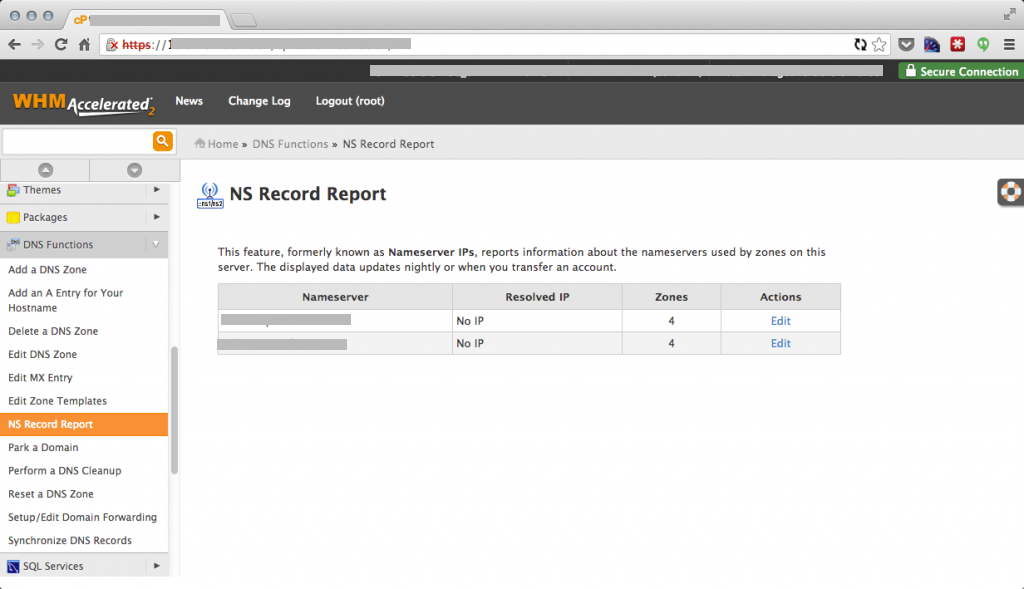
As of 11.42, the ‘Nameserver IPs’ report has been replaced with the much more useful and verbose ‘NS Record Report’. With this new report you can see the nameservers configured on your server, the IPs they are associated with, and the number of zone files that are using the nameserver in question.
On my test VM it looks like this:
We have covered how to set up, configure, and manage your very own nameserver. We’ve also covered many of the tools you might need in order to troubleshoot and diagnose your nameserver’s configuration.


